The most common questions I receive are regarding viruses and antivirus
software. If your computer is connected to the internet and you use
it to receive email, then at some point you will be subjected to virus
attacks. Some viruses can be very destructive while many others only
a minor nuisance. If you have a good antivirus software installed,
updated weekly and turned on, you should not have to worry (that much).
The antivirus software will identify the incoming virus and either delete
or quarantine the suspect file.
If you think you might be infected and don't have antivirus software,
there are a couple of things you can do depending on the working state of
your computer.
1. If your problem came on suddenly and you can catch it soon enough
then the best course of action is to shutdown your computer and then
restart it into safe mode. Then use Windows System Restore to set
your computer back to a few days before the infection. Reboot and
perform a full scan with Malwarebytes which you can get from
www.download.com .
2. If you can still get on the internet, both the
Symantec and
McAfee
websites can scan your computer for you for Free. Once you have
identified and fixed the problem, you should purchase and install your own
antivirus software to prevent future problems.
If you can not get on the internet, then your only option is to go
out and purchase antivirus software.
NOTE: The longer your computer remains ON and infected
the more damage the virus may cause. It is important to shut down
and seek help as soon as possible.
You would think that a $3000 computer would keep better time than a $10
Timex watch. NO, I have had some computers that lose or gain several
minutes per day. Whether this is a real problem for you or just an
annoyance that you can't stand, there is a solution. There are many
FREE programs that will synchronize your clock with the NIST atomic clock
whenever you want or you can set them to update your clock daily. I
have used Atomic Clock Sync, you can download this free program from
Download.com. In some rare
cases, replacing your computers CMOS battery may fix the problem.
Newer computers have the ability to update the clock automatically.
Many customers ask me if they should build or buy their next computer?
Well, the price of computers has dropped so much that you can get a low
end computer for $500 now. To build a similar one from scratch could
run you almost double that price. The biggest advantage to building
your own computer, besides the experience and enjoyment, is that you get to configure it exactly the way you want.
An other advantage is that you may be able to reuse some items from your
old computer. And finally, having built it yourself, you may be more
likely to be able to repair or upgrade it in the future. For example, without searching all over the internet
for deals or reverting to eBay for components, here is a rough breakdown of a typical entry level computer built
from scratch. Not this is a little old and based on Windows XP but
you get the idea.
Computer Case w/ Power Supply
$ 90.00
Motherboard Intel
$150.00
Processor Intel P4 3.0 ghz
$169.00
Memory 512meg
$ 89.00
Hard drive 120 gig (WD or Maxtor) $
99.00
DVD Combo CD-RW Drive (Sony)
$ 80.00
OS Window XP Home (Full Version)
$199.00
TOTAL
$876.00
*Note Motherboard contains onboard Video, Audio and Network ports.
On paper, the specs here pretty much look the same as some computers
advertised for $500. However, the component quality of this home
built version is likely to much better. Usually, the lower end
computers will use No-Name components, Lower cost Celeron or AMD processors and
generic motherboards. In the example above, all the components are
name brand and will usually result in a long lasting, trouble free system.
If you wanted you could add or change any part of the system to match your
needs, creating the ideal computer. You have probably noticed that I
choose the Intel platform, it is not to say that Intel is better, but over
the years I have built many computer systems and have found that I get the
best results, especially in reliability and compatibility, with all Intel
parts. If you don't mind a little tweaking and experimenting, there
are a lot of other choices that may result in higher performance.
But if you are looking for reliability and compatibility, I suggest Intel
for your first build.
If you are not real comfortable with starting from scratch, there are
some companies that sell kit computers or something called bare bones
systems. These systems may come pre-assembled with a case, power
supply and motherboard. All you have to do is add the memory,
processor and hard drive, saving you the hardest part of installing the
motherboard.
CHECK LIST
If you decide to build your own, you will need a check list of
components. keep in mind that some of these items may come in
combination with some other items. For example: Some computer cases
come with a power supply, some don't. Some motherboards, have
built-in video, audio and networking, others you would have to purchase
additional cards for these functions. Here is an example check list
of items you will or may need:
- Computer Case - Keep in mind room for future upgrades
- Power Supply - (Some Cases come with one)
- Motherboard
- Processor
- Memory- 512meg min
- Video Card - (Some Motherboards have built-in Video)
- Audio Card - (Some Motherboards have built-in Audio)
- Network Card - (if you need it, again some Motherboard have it)
- Wireless Network adapter (if you need it?)
- Special Purpose adapters - Depending on your needs, you may want
additional cards such as Firewire, Extra USB ports, TV or Video Capture.
- Hard Drive - 80 gig min
- Second Hard drive - Depending on you needs, you may want a second
hard drive for backup, Music or video storage.
- Some form of CD drive to install software. This could be in
the form of a CD or DVD burner or combo drive depending on your needs.
- Operating System - Windows XP Home or Pro
- Display - CRT, LCD (you may already own one)
- Floppy Drive (if you want or need one?)
- Memory Card slots - If you use a digital camera, you may want to add
card slots.
- Keyboard - Wired or wireless
- Mouse- regular, optical or wireless
- Software - You will want some form of Antivirus software as well as
some programs such as Office.
- Cables - Printer, scanner or any extensions you may need.
- Surge Suppressor or UPS to plug everything into.
TIPS
- Never work while plugged in - Anytime you are working inside
the computer, be sure to disconnect the power cord and all other
connections to printers, network and external equipment.
- Static Electricity - You should wear an ESD wrist strap to
prevent static electricity from damaging your components. Avoid
working on or in a carpeted environment. Never place components or
cards on the rug or other static generating surface.
- Reusing old Parts - If you plan to reuse some old parts from
a previous computer, watch for compatibility issues. Even though
an old hard drive may work, it may slow down the entire system. It
will be unlikely that you will be able to reuse much more than your
keyboard, mouse, display, floppy drive and maybe a CD drive. Avoid
trying to reuse internal components such as Memory, processor, power
supply and motherboard.
- Get Help - Often times I find that Motherboard and Case
instructions are rather poor. If in doubt about pin locations and
orientation, check the manufacturers web site for more detailed
instructions or seek help from others. Don't guess...
- Install one at a time - If you are building a high end
computer with lots of upgrades and additional components, get it up and
running with the basics first before installing the extras. Once
you get the basic system up and running, start adding in the additional
components, installing and testing one at a time.
- Powering up for the First Time - I can not stress enough the
importance of double and triple checking all connections and cards
before applying the power. I have seen many a motherboard
destroyed because a memory card was not seated properly when the power
was applied.
- Take your Time - I know you are anxious to get your
computer up and running, but take your time and do it right the first
time.
Go ahead, build it yourself, enjoy, have fun and ask lots of questions.
Those of you who are lucky enough to live in an area where you have
both cable and DSL to choose from, have the difficult decision of choosing
which service to subscribe to. I currently have both Cable and DSL
service installed on my network and for me, I don't really have a
preference, although DSL is less expensive. Here is what I have found. Please keep in mind the
these services can vary depending on your exact location, so your own
results may vary. Talk to your neighbors to find out which service
they are using and how reliable it is.
Cable
DSL
Reliability
Excellent
Excellent
Download
Faster
Fast
Upload
OK
OK
Open First Page Faster
Slower
Free Modem
NO
YES
Cost/mo
$42.95
$17.95
Overall, I have not found any compelling reason to use one over the
other. Cable is much faster if you typically download a lot of
large files or play online games. If you are just surfing the web
and checking your email, you will not notice any difference between the
two.
If your area experiences interruptions to one type of service more than
the other, you might want to base your decision on that. For
example: If during heavy storms, you always lose your cable TV signal but
your phone has never gone out, then you might want to choose the DSL
option.
The decision to install a wired or a wireless network can be difficult.
Wireless has become very reliable and seems like the obvious choice, but
there are several factors you should keep in mind before making the plunge.
To put it as simply as possible, the main difference between a Wired network
and a Wireless network is the overall speed of the network. The
difficult part is determining whether or not it will effect the way you use
your computers. If you are planning to use your computers to simply
check email, surf the internet and no more than 3 or 4 computers are doing
this at one time, no problem, a wireless network will probably be fine as
long as you are within the range of the wireless network (see
Poor Range on my Wireless Network). However,
if your needs are more specific and involve things like:
Backing up or accessing large files to or from another computer in the
house
Streaming Video or Audio across the network
Heavy usage of Online or network gaming
Usage of Wireless surveillance cameras
Then you might need to create an all wired network or at least wire part
of the network. The primary drawback to a wireless network is that all
computers on the network are sharing the same bandwidth. For example:
If you are backing up your living room computer to your basement computer
and at the same time downloading a large file from the internet on your
bedroom laptop, you could experience a real slowdown on a wireless network.
But if your had the living room and basement computers on a wired network
and the laptop on a wireless network, you would not see any difference in
the performance on any of the computers.
It would be impossible to discuss all the ins and outs of networking
here, but the bottom line is: It is always best to run a wired network
wherever possible and only use wireless only when absolutely necessary or
where it is impracticable to run wires. If you plan out your network
and make it a point to understand how you will be using it, you can have a
very enjoyable experience with networking.
There usually comes a time when you discover that you just deleted
something by mistake. The first thing you should do is NOTHING!
Well not exactly nothing, but my point is that the less you do on your
computer after deleting files, the better your chances are that you will be
able to recover those files. This includes digital cameras. If
you find that you just deleted all or some of your photos on your digital
camera, do not take any more photos. There are many file recovery
programs out there. Keep in mind that even if one file restoration
program did not find your files, another may. I had a customer the
other day that lost all of his photos from a trip to Europe, I went through
6 different programs until I was able to recover his photos. Call us or check out the
many programs available that can recover lost or deleted files.
Please, Please, Please... I can't stress enough the importance of backing
up your computer. At the very least, backup or make copies of your
documents, photos and any other important information like quicken files.
I can't begin to tell you how many times I get calls from customers who have
lost everything. Years of documents, family photos and address books,
gone in a flash. If you really don't want to do this yourself, there
are many companies that specialize in online backup, where your data is
stored on their computers for safekeeping.
To backup your computer, you first need something to backup to. In
the early days, a floppy disk was fine, but they do not hold enough data to
be of any value today. A CD writer, DVD writer, second internal hard
drive or external USB drive will all suffice. Check out my section on
backup devices for more details.
Depending on your backup needs, you may need some backup software.
However, Windows does have a backup routine built in or you can just copy
the files you want to one of the above devices. But if you want to
automate the process by having your system backup at night or at specific
times without your intervention, you will want to purchase a backup program.
One important step is to scan your whole computer for viruses before backing
up your files. You don't want to backup any viruses with your data.
It is always a good idea to plan your backup needs before your start.
Write a list of all the programs you normally use and take note of how large
they are and where the files are saved. The size of the files will
help you decide which type of backup device is best for you. Next you
have to decide what data is important to you. The operating system and
programs themselves can be reinstalled from the original disks, so they may
not need to backed up. But, the things that you create like word
documents, email and photos may be important and should be backed up.
After you have decided as to what needs to be backed up and how large the
files are, you have to determine how often you want to backup these files.
Obviously, backing up every hour would be the best, but this may be just too
much to do. So you must decide how much data you could afford to
loose, one hours worth, one days worth or maybe a weeks worth of data.
If you lost everything right now, what would you really want or need.
With this information in hand, you set your backup schedule and stick to it.
You never know when your hard drive will fail, a lightning bolt will hit or
a virus will take everything.
NOTE: For an easy, automatic, trouble free solution for
backing up your computer, check out the many automated online services
from companies such as
www.carbonite.com and
www.mozy.com . For as little as $54 per year you can sit back
and rest assured that your data is safe. I highly recommend this
to all my customers even if they are backup up already using other
methods.
If you are like most of us, all you want is a computer that turns on,
surfs the net, reads email, writes the occasional letter and turns off.
You should not have to put up with errors, crashes, viruses, pop-ups and the
constant calls to some support tech located in India.
Unfortunately, a computer is just like your automobile in that you have
to perform routine maintenance. If you never change your oil, rotate
your tires or bring your car in for service, it will eventually start giving
you trouble. Although you computer does not have oil to change, there
are several maintenance steps you should use to keep your computer running
smoothly and reduce the number of day-to-day headaches. For
step-by-step instructions, check out the
maintenance section of this site.
1. Avoid mixing old software with newer operating systems
System stability can be a problem if you try to use older software on a
new computer. I you upgrade to a new computer, you should update the
software that you use everyday to the latest version. Trying to run
software that was originally designed for Windows 95 or 98 on a new Windows
XP computer will usually cause problems. It is not to say that you
can't get them to run, but your chances of problems increase.
2. Antivirus Software
If you are on the net, antivirus software is a must and if you have
antivirus software, you have to update it weekly. New viruses are
created every day and the only way that your Antivirus software can deal
with these is to update the virus definitions as they come out. Most
all antivirus programs will update themselves automatically, but you have to
check the status window for your software every week to make sure it is
working correctly. Occasionally, you may need to update them manually.
Also, keep in mind that at some point you will have to purchase a new
subscription to continue receiving updates. New computers usually are
bundled with a 30-90 free subscription. After that you have to pay for
continued coverage (usually about $20 per year).
3. Run Disk Clean up every week
Windows has a built in disk cleaning utility that should be run at least
once a month if not every week. From the Start Menu, select Programs,
Accessories, System Tools, Disk Clean Up.
4. Run Disk Defragmenter at least once per month
Depending on how much you use your computer and how often you install and
delete programs and files, data on your hard drive becomes fragmented.
What this means is that files are broken up into small pieces and spread all
over your hard drive. When your computer needs to retrieve a file it
has to work extra hard to find all the information, thus reducing your
performance. Running Disk Defragmenter will reassemble all of these
broken pieces into contiguous files speeding up disk access. From the Start Menu, select Programs,
Accessories, System Tools, Disk Defragmenter. Note: depending on the
size of your hard drive this procedure may take several hours.
5. Purchase a good Surge Suppressor
Installing a surge suppressor is a worthwhile investment and purchasing a
UPS (uninterruptible power supply) is even better. For as little as
$30 you can purchase a UPS power strip that contains surge suppression as
well as a battery backup that will keep you computer running in the event of
a brief power outage.
6. Keep Windows Up to Date
Microsoft continuously makes changes and patches to Windows to fix
various bugs and security holes in their software. It is important to
download and install these updates to keep your computer running smoothly.
In Windows XP: Right Click on My Computer-Select Properties-Select
the Automatic Updates Tab-Select the way that you want your updates
installed. If you have a broadband internet connection you can select
any of the options. If you have a slower dialup connection you may
want to scheduled updates to take place late at night when you are not using
your computer.
7. Backup
Disasters happen, hard drives fail, viruses get in and people delete the
wrong files. Come up with a back up plan and stick to it. At the
very lease, back up your My Document File and any other important data that
you have. You will need it at some point. You just don't know when.
See How Do I Backup My Computer
I know that this seems like a lot of work, but you can set windows
scheduler to perform most of these in the middle of the night. For
those of you who don't leave your computer on at night. Pick one night
per week to leave your computer on and schedule all the tacks for that
night.
If you are thinking of upgrading your favorite software to the latest and
greatest version? Beware...
If you are like me and have a few key programs that you use all the time,
you have probable thought about upgrading to the latest version to get all
the newest features. Well, I can't express enough the importance of
doing a little research first, especially if you have a slightly older
computer. In order to get all those new features you want so badly,
you will usually sacrifice something and it usually means speed. I
just upgraded a program on my faithful laptop and the program is now
unusable to me. Granted, my laptop is an older 400mhz model with only
256 meg of memory, but it has worked fine for every application I currently
use or need on a laptop. I did upgrade the hard drive and installed
Windows XP for reliability reasons, but it has worked well for many years.
I use a contact manager (I will not mention the brand) to organize my
appointments, check email and store all my customer information. I use
it all the time and is probably the most important and useful software I
own. When a customer calls, I can enter their name and wallaa... all
their information is on the screen. I have access to what type of
computer they have, when I last worked on their system, the type of problems
they have had in the past and just about any other information I need to
know. I figured that since I use this program all the time, it would
be well worth the cost to upgrade to the latest version... Right, it makes
perfect sense? It must have some new features that would make it even more
useful to me. Well that was my first mistake. I assumed that
since I had a version that was a few year old, the new one must be better,
faster and easier to use. WRONG!!! I happily paid the $229 for
the latest version and installed the update. I was so excited in
anticipation of what new features I would discover and how much time I could
save with this new program.
Well I have to tell you, I should have just given that $229 to the first
person I ran into on the street. The new version is virtually unusable
to me now. It takes over 3 minutes to start the program, over an hour
to backup my data and by the time my customers information comes up on the
screen my cell phones battery is just about dead. My first thought was
that I must have had a problem during the installation or some settings on
my computer must need to be changed. I called technical support
expecting to discover an easy resolution to my problem and there was none.
The company had changed the database engine and needs more memory and a
faster computer then the earlier versions. Even though my computer meets the
minimum computer requirement stated on the package, it is too slow to be
useful.
OK, I have given you my story and I apologize for bending your ear, but
you can see that I am very disappointed. Anyway, let me get to the
part where I tell you how to avoid these same problems:
1. Check the system requirements for the software
Most retail boxes or software Websites state the minimum system
requirements as well as recommended system requirements to run their
software. Minimum requirements means the program should run, but
that's about it. If you want the program to run well make sure you
have a computer that meets the recommended requirements.
2. Check the Companies Website
Go to the companies website and check in the support section for known
problems with the software. If they have a forum, check there too.
You may find some complaints here but many companies remove the really bad
ones or don't allow you access until you become a registered user.
3. Search other Support Forums
There are many forums out there that you can check for other people that
are having problems with a particular software. You can even just go
to google or yahoo and type in "problems with xyz software".
Unfortunately, I did not check the internet until after I purchased and
installed the software. I see now that everyone is complaining about
the same problem that I am having.
4. Backup everything before you upgrade
Backup all your data before you upgrade any software. You may find
that you need to go back to the original version.
When it comes
to digital cameras, more megapixels is not always better. I will explain
in a moment. Let me first say that, if you have not experimented with
digital photography as yet, I think you will really enjoy it. However,
you should be aware of several differences that may or may not be
important to you depending on your picture taking habits and needs. In
discussing these differences, I am assuming that you are not considering
digital cameras over $1000, but are looking at the consumer level camera
in the $200-$800 range. You can easily spend $3000 and more (not
including lenses) for professional Digital SLR cameras. Based on several
years of selling consumer level digital cameras at a major retailer and
some experimentation with my own equipment, I have found the majority of
complaints and/or concerns to be in the following areas. I only mention
these to inform you of the possible issues you could run into and I don’t
mean to imply that digital cameras are loaded with problems. I could not
live with out mine, but if you have some very specific needs or
expectations, you may want to consider the following:
-
Slow Start
– Digital cameras take longer to turn on to get ready to take the first
picture. This can be a problem when you see something to shot and that
special moment has past before you can turn it on.
-
Shutter Lag Time
– Digital cameras
generally take longer to actually snap the picture when you first press
the shutter button, often causing you to loose that split second perfect
photo. Newer cameras a getting faster but it still can be a problem for
some people. Especially if you take a lot of action shots.
-
Slow Shutter Speed/Low Film Speed
– Consumer graded digital cameras just don’t seem to do as well as film
cameras on action or moving subjects. You also have to hold the camera
very still for a good clear photo, especially when zooming. This can
cause blurry photos on sports shots. You may not be able to get the
same kind of photo that you can get with a good SLR camera with high
speed film.
-
Time Between Shots
– Most of the low to
mid range digital cameras require several seconds to save your photo to
the memory card before you can take the next picture. The higher end
cameras have a burst mode that may allow you to take several quick shots
before having to save the images. If you take fast, consecutive
photos, this could be a problem.
-
Poor Battery Life
– Digital cameras can
really consume batteries. Newer digital cameras are getting better at
this, but can still be a problem for some users.
Note: If you purchase a
digital camera that uses a rechargeable battery, you will want to pick
up a spare battery.
-
All
your Eggs in One Basket
– Digital cameras
store their images on memory cards opposed to film. You can purchase
different size cards that will allow you to store anywhere from just a
few photos to well over a thousand. I have had customers that on
occasion have had a defective memory card and lost all of their photos.
The entire trip was gone in a flash. The dilemma that you face is do
you use a single large memory card or several smaller cards. With a
single large card you face the possibility of losing everything where as
with several smaller cards, if something goes wrong, you lose a smaller
number of pictures.
-
What do you do with all the Photos
– Most people find
that they take far more pictures with a digital camera then they ever
did with a regular film camera. The problem you face is where and how
do you save all of those photos. I have seen too many people simply
downloading their photos to their computers hard drive and thinking they
are safe. Then 2-5 years down the road something goes wrong with their
computer and they lose everything. Years of photos down the drain. You
need to set a plan for long term storage of those photos. Saving them to
you hard drive is not enough. You need to back them up onto CD’s, DVD’s
or an external Drive and even then you should make more than one copy. By the way,
make sure you test the backup to make sure the photos are really there.
-
Picture Quality
– is in the eyes of
the beholder. If you are accustom to taking photos with a high end 35mm
SLR, you may not be happy with the photos taken with a consumer level
digital camera. But if you have been using a pocket 35mm or disposable
film cameras, you will probably be pleasantly surprised. Keep in mind
that printing is a big part of the overall image quality.
-
Printing Pictures
– Now that you have
taken hundreds of digital pictures, what do you do with them? Digital
Photo printing has come along way and personal home printers are getting
better and cheaper every day. Only a year or two ago, printing 4 x 6 photos at
home would cost you about $0.65 each (paper & Ink). Today the price has
dropped to about $0.30 a print (not including the initial cost of the
printer). The quality of home printers has also improved. You also
have many other options such as emailing your digital images out to be
printed or going down to your local Walgreens, Walmart or camera store
for prints. You can expect to spend about $0.29 per 4 x 6 print with
most of these outside sources. Keep in mind that these prices are
dropping daily.
-
Don’t just Print Photos
– There are so many
possibilities with digital photos. I have found that I rarely even
print individual 4 x 6 photos anymore, but prefer to create slide shows
on CD or DVD with music or narrative. When I do print, I enjoy making
large photo collages. After one of my last trips, using a graphics
design program, I scanned in the map of the island and placed our photos
at the appropriate locations on the map according to where they were
taken. Using a large format printer, I printed a 14” x 28” poster and
had it framed. There are many programs available for creating slide
shows, photo calendars and collages. Be creative and have fun.
Selecting a Digital Camera
If you are new to
digital photography and have some extra money to spend, I often recommend
starting out by purchasing a low end camera (<$200) or even borrowing
one. Take it home, take some photos and experiment. After you have used
it for awhile, you will have a much better idea of the limitations, pros &
cons and what features are important to you. Then go out and purchase the
camera with the specifications that meet your needs. Keep the low end
camera for travel, pass it on to the kids or sell it on ebay. Having said
that, let’s take a look at some of the things you should be looking for
when purchasing a digital camera:
-
Size
– One of the first things you have to consider is size. Do you want a
camera to slip into you purse or pocket or one that requires a camera
bag and someone to carry it. Keep in mind that along with smaller size
usually comes fewer features, smaller lenses and lower quality photos.
Similar to the differences between large and small film cameras. Also
remember that even though you may be trading photo quality for camera
size. Having a small pocket camera may allow you to capture moments
that may not have been possible with a larger camera just due to the
convenience factor of the smaller size.
-
Mega pixels
– This is basically
the total number of dots that are used to make the photo. A 3.0
megapixel camera has roughly 3 million tiny dots. Some professionals
claim that good quality 35mm film photo would be somewhat equivalent to
a 15 megapixel digital camera, others claim it is more like 8 megapixel.
Personally, for the average user printing 4 x 6, 5 x 7 and the
occasional 8 x 10 photo, a good 3.0 megapixel camera is fine. I
would much rather have 3 million good, clear dots than 8 million fuzzy
ones. I may be over simplifying this, but what I am getting at is
Megapixel count is not everything. Even though the number of megapixels
is just about the only specification you ever hear about, it is by far,
not the only thing that dictates the quality of the picture you are
going to get. The quality and size of the lens, type of image sensor,
auto focusing system, Light metering system, and firmware all contribute
to the final image quality. I have one 2.0 megapixel camera that takes
far better pictures than some of the 4.0 megapixel cameras I have used.
If everything else is equal (2 identical cameras), than the higher
megapixal camera is better. But that is never the case. I had one 4.0
camera that took terrible photos, until I downloaded new firmware for
it. Yes, the internal software that interprets all that information
coming from the sensors, decides what settings to use and then
compresses the photo to save it on the memory card can ruin even the
best photo. In general, all things being equal, if you plan make large
prints or use your photo editing software to crop and zoom into sections
of your photo, then more megapixels is what you want. But don’t
sacrifice lens quality and other features just to purchase pixels. One
thing to keep in mind, watch out for the words “interpolated”, some
cameras will use an electronic means of guess at the information between
pixels, thus reporting a higher number of megapixels than the actual
sensor. You will also see the word “Effective Megapixel” or “Actual
Megapixels”. Effective means that the sensor inside the camera has
blocked some of the pixels to create the standard photo aspect ratio, so
the sensor may be 4.3 megapixel but it is only using 4.0 to create the
photo. The effective number is what is actually being used.
-
Lenses and Zoom
– There are many types
of lens used on digital cameras ranging from the inexpensive, plastic,
fix focus lens like those found on many low end cameras (similar to what
you would find on a disposable film camera) to high end interchangeable
SLR lenses. In general and oversimplifying this, you want to look for
the largest auto focusing lens with the most optical zoom. I would go
with a minimum of 3x optical zoom. This would be roughly equivalent to
35mm to 105mm for those of you familiar with lenses on film cameras.
Many cameras report something like Total Zoom, this is a combination of
optical zoom and digital. Don’t pay any attention to digital zoom.
Digital zoom is an electronic form of zoom and is really no different
than zooming in with your computer after taking the photo. Using it can
make you photos fuzzy or grainy looking. Optical Zoom is all you should
care about, this is the actual zoom of the lens only.
Note: Avoid using digital
zoom on the camera. Zoom is as far as you can with optical zoom only.
If you need to zoom in closer, you can do that later using your photo
editing software on your computer. To lean more about Digital Zoom vs.
Optical Zoom, check out
http://cameras.about.com/od/cameratips/l/blopticaldigitl.htm .
-
Type of Memory
– There are several
types of memory cards used in digital cameras. Compact Flash, Secure
Digital (SD), XD, MMC, Memory Stick. The type of card is usually
dictated by which manufacturer of the camera you choose and which type
of memory card they have adopted. Some of the cards are a little more
expensive, but if you wait for a sale, you can usually find a good
deal. You will need to purchase at least one additional memory card.
Most cameras only come with enough memory to save only a few photos
(usually 8 to 16 high quality photos). The memory cards come in
different sizes, some capable of saving several hundred photos. The
number of photos you can take depends on the resolution (megapixels) of
the photo and the size (megabytes) or the memory card. The higher the
megapixels the fewer the photos you can take. Here is a brief outline
of the types of cards and which camera manufactures use them:
a.
Compact Flash (CF) – Many Canon and Nikon and most high-end
and Pro cameras
b.
Smart Media – Not used anymore - Older Olympus, Fuji
Cameras and MP3 players – Max 128meg
c.
Secure Digital (SD) – Most common Now- Most pocket cameras
including Canon, Nikon, Casio, Kodak, HP, Pentax, Minolta, Panasonic and
most PDA’s, Pocket PC’s and Video Cameras.
d.
Secure Digital Mini – New, Some camera cell phones
e.
Memory Stick – Primarily Sony Cameras and PDA’s.
f.
Memory Stick Pro – Newer, Available in larger sizes for Sony
Cameras, not usable in older Sony.
g.
Memory Stick Duo – Newer, small format- not compatible with
older products.
h.
Multimedia Card (MMC) - Not really used anymore in cameras-
still in use on some cell phones.
i.
X digital (xD) – New card for Olympus and Fuji, a little
higher cost, small and easy to misplace.
Keep
in mind that if you already own memory card capable equipment such as a
TV, Computer, PDA or a printer, you may want to stay with a camera that
uses the same cards. For example: If you own a Sony Television that has a
memory stick slot, you may want to purchase a Sony camera so that you can
view your photos on the TV without any additional cables or hardware.
Simply remove the card from you camera and insert it into the TV.
Note:
Most all cameras have quality settings that will allow you to reduce the
size of the file, thus saving more pictures to the memory card.
Experiment with these settings, for many people find that even though they
have a 6 megapixel camera, taking pictures at something less than the
highest setting is plenty good for their needs and will allow you to take
more photos (especially good for travel).
-
Batteries
– There are many types
of batteries used in digital cameras. The main thing to keep in mind is
that digital cameras go through batteries, some more than others. Some
cameras use standard AA size batteries and others use a special Lithium
Ion Rechargeable battery that is usually specific to that camera. There
are advantages and disadvantages to both:
a.
Lithium Ion Rechargeable – Generally longer life, however
you need to have your charger with you and spares or replacements can be
costly or hard to find. I recommend having a spare with you.
b.
AA Size – These do not tend to last as long, but you may
have options to purchase rechargeable versions and even one time use
Lithiums. It can be more convenient if you travel a lot. With some
cameras, you may be able to put in a set of regular Alkaline batteries in
an emergency if you can’t get to your charger.
-
Auto and Manual Modes
– The better cameras have the ability to take pictures in both full
automatic mode (Point and Shoot) as well as Manual Mode. Manual mode
allows you to set things like aperture, shutter speed and focus manually
to really get the picture you want.
-
Video Mode
– You may or may not be interesting in the Video mode that comes with
most digital cameras. But if you are planning to use it, check the
specs. Some cameras can only take short 15-30 sec videos at low
resolution (320x240). Other can take unlimited video up to the size of
the memory card at 640x480. I did not think that I was going to use the
video mode, but have found it to be a lot of fun.
-
Other
– There are many other
available features that you may want to consider such as Macro (ability
to take very close shots), Panoramic modes, Sound Recording and outputs
for TV. But I think you get the idea.
I apologize for getting
carried away again. I guess the bottom line is to purchase the
most megapixel with the maximum optical zoom you can afford. I
prefer to stick to name brand companies that are known for making high
quality cameras such as Canon, Nikon, Pentax and Minolta and stay clear of
no-name brands.
Related Sites-
If you want you learn more about Digital Cameras or just compare camera
specifications, I have found
www.dpreview.com to be very helpful and detailed.
Guide to Safe Internet Surfing
Concerns
about internet security are valid and I am sure this question will draw a lot of
response as well as controversy over the exact methods to accomplish your
goals.
In my
opinion, there are several steps as well as general guidelines you should follow
to reduce your exposure while surfing the internet.
Note: The only way to be 100%
Protected is to have no internet at all. Please keep in mind that whole books
are written on this subject and I don’t intend to cover the details of each and
every aspect, nor step by step instructions.
HIGH SPEED INTERNET
CONNECTIONS
-
Router
- Regardless of who your internet service provider is, your first line of
defense is to install a Router between your CABLE or DSL modem and your
computer. Some companies now provide a modem with a built-In router, so check
your manual for details. You can purchase a basic router for as little as $30.
Even better, would be what they call a Firewall Router (Router with built-in
firewall) which can run $50 or more.
-
Router Settings
–
Always change the default factory username and password to access your router.
Depending on the type of router you have, there could be additional security
settings within the router that you may want to change..
-
Wireless Router
– If you are planning to go wireless and have purchased a wireless router, you
should be aware that the factory settings have no security at all and need to
be changed once the system is up and running. Anyone driving by your house can
access your connection. At the very least, I would change the router password,
enable WEP encryption and MAC filtering. (I will save this for another time)
CREDIT CARD TRANSACTIONS
-
Protected Accounts
- If you plan to purchase goods and services online, I would recommend setting
up a special online account such as PayPal.
-
Using a Single Card
- If you prefer to use one of your current credit cards, set aside a single
credit card for all online purchases. Don’t use that card for any other
transactions except online. It will be a lot easier to spot errors and
fraudulent charges if it is not filled with normal everyday charges.
-
Fraud Protection
- Use a credit card that comes with some form of fraud or online purchase
protection. (check your credit agreement).
-
Low Credit Limit
- Select a credit card with a lower credit limit. Having a credit line of
only a few thousand dollars opposed to $18,000 can reduce your potential
liability.
-
Purchase From Know
Companies
- I know it is hard to resist, but I would suggest only purchasing from known
companies or ones that have been recommended to you.
-
Do not Respond
- I would strongly advise against giving credit card information to any
unsolicited websites (pop-up ads or email solicitations).
-
Avoid Following Links
- If you want to go to Borders to purchase a book, type their web address in
directly, instead of following an unknown link contained within an email. It
could take you to a fictitious site that looks just like the original.
-
Spelling Errors
- When typing in the address to a website,
double check your spelling. Some fraudulent websites take
advantage of common misspellings and may look just like the real thing.
-
Common Sense
- Use your common sense. If it seems to be too good to be true? … Well, you
know the rest of the line.
USERNAMES AND PASSWORD
-
Do Not Save your
Passwords
- I know it is not as convenient and a real pain, but never store or save your
usernames and passwords for anything. Always type them in directly each time.
This especially goes for any form of online banking.
-
Create More Difficult
Passwords
- Be more creative with your passwords, avoid using easy to guess things like
your name, birthday and child’s name.
-
Use Numeric and
Alphanumeric
- Passwords are harder to break if they contain both numbers and letters.
-
Don’t use the same
Password
- Avoid using the same username and password for everything. Mix it up as much
as possible.
-
Change your Password
– You should change your password as often
as is practical.
EMAIL ACCOUNTS
Separate Email Accounts
– I always suggest setting up an extra email account for yourself to be used for
all online activity. Most internet service providers such as AOL, Comcast,
Verizon and MSN allow you several free email addresses. Use one email account
for friends, family and business (the emails that you really care about). Use
the other account for all other activity such as registering your computer,
software registration, subscriptions to forums and online purchases. Each time
you submit you email address online, you have the potential of it getting on
some spam list. This can help you keep the flood of email somewhat organized and
worse case, if it gets completely out of control, you can delete the account and
start over without the hassle of changing your main account.
EMAIL SETTINGS
Depending on what email program you are
using, you can change the way email is handled to reduce the likelihood of
contracting a virus.
1.
Receiving Attachments
- You can change the settings to prevent attachments that may contain viruses
from downloading. This can be a problem if you regularly receive attachments
because you may not be able to open them.
2.
Opening Attachments
– The majority
of problems come from opening attachments. Do not open any attachments unless
you know the sender and even then I would not open them unless you were
expecting it.
3.
Displaying Email
- I would recommend changing the settings to not show you the contents of an
email until you double click on them.
4.
Downloading Pictures
– You
can also choose to be prompted before downloading pictures within emails instead
of displaying them automatically.
5.
Junk Mail
– Explore the options
for filtering spam so that you can automatically move them to a spam or junk
mail folder. If you wish, you can have them deleted, but I prefer to brief
through them to check for the few real emails that may be misdirected.
PERSONAL INFORMATION
-
Never give out personal
information -
I would never give my social security
number to anyone. The same goes for account numbers and passwords. If
someone called you on the phone, would you give them this information? So,
why would you give it to someone on the internet?
-
Be very careful of bank
inquires –
I received an email recently that looked very official. It stated that there
had been some unusual activity on my bank account and that I should follow the
link and enter my account information to verify. If it were not for the fact
that I did not have an account with them, I might have replied and given some
stranger all of my personal information.
SECURITY SOFTWARE
You are going to need some form of security
software. There are numerous software packages out there for handling all forms
of security from Virus protection to encryption. In most cases, unless you
really enjoy diving in and learning all about it, I would recommend installing a
single, self contained Internet Security Package that includes at the minimum,
virus protection and a Firewall (ie. Norton, Mcafee, CA, AG). You can purchase
each product individually and in some cases mix and match products from
different companies to achieve the maximum protection, but you always run the
risk of problems or conflicts between products. I prefer to make it simple, one
product from one manufacturer. You can purchase all kinds of special software
to hide your every move, permanently delete files, encrypt your files and even
monitor your children. I am not that paranoid, but it is all available.
SPYWARE
I would recommend
installing one of the many programs available to block and/or remove spyware.
Fortunately, two of the best ones are available for download for free. Spybot
and Adaware. There are also many other good ones out there.
INTERNET SETTINGS
-
Security Settings
- You can change your security settings from within Internet Explorer, by
clicking on TOOLS-INTERNET OPTIONS. There is both a security tab and a
Privacy tab that you can use to customize your settings. Without getting into
all the options, I would suggest experimenting with the various levels of
protection and then surfing. If you find you are having problems you can
readjust the settings. If you normally go to the same few sites you can add
them to your trusted Zones. The privacy tab allows you to adjust how your
system will handle Cookies. Some sites require you to accept cookies, but it
all depends on your individual surfing habits. Again you can add common sites
to Trusted Zones to override security problems.
Happy Surfing!
Back to Top
Format and Reinstall Windows
Let
me start by saying that a complete reformat and reinstallation of your operating
system is something that is often required when a computer system has just
become too damaged to continue attempting repair. Over time, viruses, spyware,
installing and uninstalling programs and errors that compound themselves, can
eventually bring even the fastest computer to a grinding halt. Many avid
computer users plan a complete restore once a year or two just to keep things
running smoothly. Having said this, there are a number of steps that should be
taken prior to reformatting as well as things you can do to help speed up the
process the next time.
First:
Keep in mind that reformatting and reinstalling Windows brings your computer
back to the first day that you used it. You will lose everything that you
installed and saved to your hard drive since that first day. This includes any
online updates. It is extremely important that you have backed up all the data
that you want to bring back to your computer. Word documents, photographs,
music, address books and emails are just a few examples of the things you might
want to save. Don’t assume your backups are good. Double check your backups by
reading or restoring a few of the files back to your computer and viewing them.
Don’t forget to run a complete virus scan on your saved data to prevent bringing
back viruses that you may had.
A few notes on backup:
There are a number of methods and programs available for backing up data. Check
each of the programs that you use for a built-in backup routine. Programs such
as Quicken and Act! have their own backup routines (usually under the file
menu). If you use outlook for email you can down load a backup routine from
Microsoft to save your emails and address books. Windows XP Pro also has its
own backup program under Programs-Accessories-System Tools. XP Home does not
come with a backup program by default, but is available on the original
installation CD.
Second:
Check to make sure that you have all the installation disks for the hardware
that you mentioned as well as any software that you originally installed.
Download and save to CD all updated drivers and software for your Video Card,
printers, scanners and any other hardware that you plan to use. If you have
downloaded any programs, you will need all your Key codes for them as well.
Ok,
let’s get started on the reformat and restore process. You did not mention the
make or model of your computer, so there is one of four possible methods
available to you.
-
Built in Restore
– Many newer computers come with a built-in restore process saved to a second
partition on the hard drive. This can usually be accesses by pressing a key
during the boot process. For Example: Pressing F10 during boot on HP
computers will bring you to a restore menu. Check your computers manual or
online to see if you have this option.
-
Restore CD’s
–
Some computers come packaged with a set of Restore or Recovery disks. The
first disk is a bootable CD and is inserted into the CD drive during boot-up.
-
Original Windows XP Disk
– If you don’t have either of the above,
then you will have to use your original Windows XP disk (you will need your
Installation Key Code). If your XP CD is an upgrade version, then you will
need an old Windows 95, 98, ME disk as well.
-
No CD’s and No Restore
Partition
– If you have lost your Restore CD’s or
never received any and your computer does not have a restore partition, you
can usually order a set of Restore CD’s from the manufacturer of your computer
for a minimal charge of about $20.
STEP-BY-STEP
-
You Have Built in
Restore
-
Backup All Data.
-
Unplug all USB devices like printers,
scanners and palm pilots. If you have several internal cards that you added
after you purchased the computer, you may need to remove these.
-
Check Manual for proper key to press for
restore or it may show up on the opening screen.
-
Enter restore mode.
-
Follow onscreen instructions. (takes
about 30 min)
-
Install Drivers for special hardware
(hardware that did not come with computer)
-
Check Device Manager for any Yellow
Exclamation Points indicating missing drivers or errors. Click START-CONTROL
PANEL-SYSTEM-HARDWARE-DEVICE MANAGER. (Select Classic View) If you have any
Yellow Exclamation Points, you will probably need to install drivers for
these devices from your CD for that piece of hardware.
-
At this point you have a fairly clean
installation and it is time to Update windows. Download and install all
Windows updates, especially Service Pack 2 (if not already at SP2).
-
Install and setup any additional external
hardware like printers, scanners, Palm pilots, etc. Install each one at a
time and reboot and test before installing the next item.
-
Install additional software that you have
on CD like Office, Quicken and Photoshop, except Antivirus software.
Again install one at a time, reboot and test before going on to the next.
-
Once you have all the hardware and
software installed and running, it is now time to install any security
products that you may have like antivirus software, Software Firewalls and
Spyware/popup blockers. (you don’t want to have too many redundant programs
running)
-
With Antivirus software up and running
and updated online with the latest virus definitions installed, you can now
go online and look for updates for other software or download programs that
you want to reinstall.
-
Using whatever method you used to backup
your data, you can now restore your data back to your computer. Don’t do
this until you have antivirus software running. You don’t want to bring back
viruses that may have caused your original problems.
-
You can now go in and tweak your settings
to what ever you like, add screen savers and set things up the way you want.
-
Now that everything is up and running
just the way you like it, it is time to backup your settings. I prefer to
use something like Norton Ghost to make a disk image of this state. If you
want to reformat and restore your computer again in the future, you can
restore it back to this point instead of all the way back to the beginning,
saving a huge amount of time. You could also use Windows XP Pro Backup to
make a recovery set. I also recommend using Windows Restore to save a
Restore Point at this point. Some people like to set a restore point after
each of the steps above in the event that something goes wrong along the
way.
B. You have
Restore/Recovery CD’s
-
Backup All Data.
-
Unplug all USB devices like printers,
scanners and palm pilots. If you have several internal cards that you added
after you purchased the computer, you may need to remove these as well.
-
With computer running, insert Recovery CD
in drive and restart computer. Note: Make sure your CD’s are clean of any
finger prints and smudges by wiping them from the center out. If
recovery window does not come up you may have to go into your bios and
change your boot order to boot from CD first. (Check your manual for exact
key sequence to enter the bios settings)
-
Enter restore mode.
-
Follow onscreen instructions. (takes
about 30 min)
Follow Steps 5 thru 15
above
C. Using Windows XP Disk
1. Backup all data.
2. Unplug all USB
devices like printers, scanners and palm pilots. If you have several internal
cards that you added after you purchased the computer, you may need to remove
these as well.
3.
With computer running, insert
Windows XP Installation CD in drive, ignore the installation screen and restart
computer with the CD in the drive. Note: Make sure your CD’s are clean of
any finger prints and smudges by wiping them from the center out. A short
message will display “Press Any Key to boot from CD” Press key quickly. .If your
computer will not boot from the CD, you may have to go into your bios and change
your boot order to boot from CD first. (Check your manual for exact key sequence
to enter the bios settings)
4.
Windows will now load some
setup files and if you need some 3rd party disk drivers such as those
required for some SATA drives you will have only a moment to press F6 to do
this. Otherwise wait until you see the Welcome to Setup screen. This screen
will display your current disk partitions. I would suggest using the ”D” key to
delete the current windows partition and then use the “C” key to recreate the
partition. NOTE: If you have a fairly large hard drive I would suggest creating
2 partitions. One for the windows operating system and another for your data.
This way if you want to reinstall windows again in the future, you data will be
safe on the 2nd partition.
4a. Once you have created the partition or
decided to keep the original partitions, Windows will format and start to
install windows as well as prompt you for your Code Key for the CD case. This
should take about 30 to 60 minutes.
Follow Steps 5 thru 15
above
Good
Luck!
Back to Top
Setting Up A Wireless Network
Setting up a Wireless network can be a relatively simple task if all goes well.
Just to give you an idea, I have on many occasions, been able to setup a
complete Wireless Network, similar to the one you described, in under an hour.
Having said that, I have also had similar jobs that can take days to work out
the kinks. All you have to do is visit a few networking forums to get a taste
of all the potential problems you can run into. If all the computers are in good
working order, no viruses and minimal problems, it should go fairly well. If
you have a computer that is already giving you problems, watch out. I will
explain later… Even though you asked specifically about ADSL, cable is just
about the same, so I will discuss it as well.
General Wireless
When installed properly, a wireless network
is terrific alternative to having to run wires throughout your home or office.
Today’s wireless routers and access points are more reliable, faster, easier to
setup and lower cost than ever before. They still do not perform as well as a
wired network when it comes to data transfer, but for most applications, they
are plenty fast. I ran some tests a few months ago just to compare the time it
took to move a 28 meg file from one computer in my house to another using some
of the different standards versus using a wired network. If you are just
accessing the internet, these numbers may not affect you, but if you are moving
or backing up large files across your network, streaming video or music from one
computer to another, it can make a big difference. Keep in mind that this is
not a scientific study and results can and will vary depending on the distance
between computer and router, the computer and router settings, the number of
computers on the wireless network, manufacturer of the equipment and what type
of antivirus software you are running.
Time to Copy 28mb file
from one computer to another on the network:
Hard Wired Network 10/100 4 seconds
Wireless 802.11b 70
seconds
Wireless 802.11g 36
seconds
Wireless Pre-N 12
seconds
Note:
The laptop to run this test was 15 feet and through one floor away from the
Wireless Router and indicated that it was receiving and excellent signal.
Wireless Standards
There are several wireless standards to
choose from for use in the consumer market as well as a few proprietary versions
of those standards. Without getting into all the details, which I don’t even
know, I will try to break it down into 4 main categories and discuss the pros
and cons of each. Please keep in mind that much of this is based on my own
tests and experience and that every installation is different.
1.
Wireless 802.11b
– This standard operates at 2.4ghz and has a maximum data rate of 11mbs. This is
the most commonly used standard, but will be overtaken by 802.11G very soon.
They can be purchased for very little money now, but unless you need are small
and your computers are close together, I would pay the extra for G.
2.
Wireless 802.11a
– This standard operates at 5.8ghz and has a maximum data rate of 54mbs. This
standard is not compatible with any of the others. You can find it used in some
business applications or where someone is have a lot of interference problems
with other devices running at 2.4ghz. I would not recommend using this standard.
There are also a few 802.11a,b,g units out there that will work on all three of
these standards.
3.
Wireless 802.11g
– This standard operates at 2.4ghz and has a maximum data rate of 54mbs. This
is fast becoming the most popular standard and is compatible with older 802.11b
systems as well. There are also some proprietary G units that have increased
speed such as Speed Boost or Super G. These units are compatible with other b
and g models as well but will only give you the speed increase when used with
like cards from the same manufacturer.
4.
Wireless 802.11n
– This standard has not been approved yet, but there are units out there called
Pre-N and Mimo. They operate at 2.4ghz and have a maximum data rate of up to 300mbs. This
standard will probably take over the market due to it’s increase in speed and
range. I have installed several Pre-N systems and I have found that the range
at least doubled if not tripled and is very fast. The Pre-N units are also
backward compatible with both 802.11b and g but you will not realize the full
potential of this standard without using the matching cards. However, you will
experience an improvement in range even when used with pre-existing B and G
cards.
Common Problems,
Complaints and Concerns
-
Poor Range
– One of the most common complaints I get is related to range. Wireless range
is dependent on a large number of factors. Just to give you an idea of how
varied it can be, I have had installations where a wireless laptop could not
even receive a signal 20 feet away in the next room. Using the same equipment
in another location, I was able to go over 100 feet. At these high
frequencies, wireless signals are interfered, reflected and absorbed by all
kinds of common household items. If you suspect an interference problem, I
would suggest changing the default channel (usually chan 6) to either 1 or 11
to help eliminate interference from Cordless phones and other wireless
networks. Here are a few of the common reasons for poor reception:
·
Interference from cordless phones operating
on the same 2.4ghz frequency.
·
Interference from wireless speaker systems,
baby monitors, wireless video cameras and security systems.
·
The exact placement of the router and
receiving computer.
·
Other wireless networks in the building or
neighborhood.
·
Microwave Ovens
·
Construction materials used in the walls or
floors (metal studs, foil backed insulation, wire mesh).
·
Large metal objects such as refrigerators in
the room or in direct path of the signal.
·
The type and amount of furniture in the
house.
·
Even the number of people in the room can
alter reception.
-
Frequent Loss of
Internet
– It is not uncommon to loose your wireless connection to the internet every
once and a while and may require resetting your router or modem or just
waiting for it to come back on. This could be due to problems with your
service provider or your equipment and is sometimes very difficult to
determine where the problem lies. There are a number of steps you can take but
I will have to save this for another time…
-
Security Concerns
– You may hear a lot about security concerns associated with wireless
networks. I don’t know about you, but my computer does not contain the
security codes to the pentagon and I don’t store any of my passwords or
account numbers on my computer. So if someone wants to steal this document,
go for it… On the other hand, you should know that setting up a wireless
network using the factory default setting has no security at all. Anyone
driving by your house can access your internet connection. You will need
to change some of the settings on your router to enable security features. I
will get into some of the basics of this later on in this document (see
Security Settings).
-
Too Slow
– All of the wireless standards above are typically faster that most of the
available DSL and Cable connections available to home users today. So under
normal internet usage and reading email, speed is not usually an issue for a
few computers on the network. However if you have many wireless computers on
the same network and some are performing other tasks over the network or you
plan to move a lot of large files over the network, you will want to take this
into consideration when designing your network.
Layout the Plan
-
One computer hardwired
– It is desirable to have at least one of your computers hardwired to the
network to simplify setup and future troubleshooting. It is not necessary to
keep it wired, but will make troubleshooting and setup much easier. You can
make it wireless later if you want. If you are planning to use one computer
as a server or central storage place for data and even a print server, you may
want to keep this one hard wired to the network. It is still desirable to
have as many computers hardwired as is conveniently possible and leave the
rest for wireless.
-
Location of Hardware
– Placement of your wireless router/access
point is critical for optimum performance. Placing it in a central location
equal distance from all the receiving computers is desirable. Also, installing
it above the receiving computers is generally better than below. In other
words, placing the router/access point in the attic is usually better than in
the basement. Installing it in the far corner of the basement and expecting to
get reception on the 3rd floor at the opposite end of the house is
unlikely.
-
Avoid other objects
– Place the router/access point away from
other items in the room such as computers, wires and large objects. Move it
to a location high up on a shelf away from your computer, monitor and printer.
-
Experiment First
– If
you have a laptop with wireless capability, you can use it to test your layout
prior to finalizing your plans. You will need a Wireless Router or Access
Point, but you do not need to connect the router to your DSL or Cable modem to
run some placement tests.
-
First hardwire your wireless
router/access point to one of your computers and go into setup (check your
manual) and change the SSID (this is the routers name as it will seen by
other computers) to anything other than the default. If you leave the
default setting for the SSID, which is usually the name of the manufacturer
(linksys, D-Link, Netgear), you might pick up someone else’s signal with out
knowing it. I ran into this just the other day.
A
new client called asking me to fix a problem they had been having for over a
year, printing to a network printer in another room in the house. When I
checked the computer in question, I found that it was not even on their own
network. It had been receiving a wireless connection from the neighbor’s house
next door for over a year. They were unaware of this because both houses had
the same default SSID and this computer was out of range of there own network.
2. Now disconnect the Router/Access Point
from the computer you used to set the SSID and move it to the location that you
plan to test. Simply plug in the power to the router and walk around your house
with the laptop. Go to each location of interest and check the signal
strength. Each wireless card has some form of utility to view the status of
your connection or you can just use the Windows indicator. In some cases they
will even give you a nice bar graph (check your manual). There are several
programs that you can download like netstumbler that can help survey your
location. You can experiment with different locations for both your
router/access point and your receiving computers. Keep in mind that sometimes
simply moving the router a only a few inches away from an object can make a big
difference.
Basic Network Layout
The following is a simplified diagram of a
typical network setup with all the components you will need. Figures 1,2,3,and
4 all basically accomplish the same thing. Where Figure 1 shows all of the
individual components and Figure 4 is a single box containing everything on one
unit. You can either purchase all the components separately or purchase combo
units that contain multiple components within a single box. The idea is similar
to a stereo system. You can purchase a tuner, amplifier, CD player separately
or purchase a complete Receiver with everything built-in.
-
MODEM – ROUTER – HUB/SWITCH – WIRELESS
ACCESS POINT
-
MODEM – ROUTER(w/built in switch) –
WIRELESS ACCESS POINT
-
MODEM – WIRELESS ROUTER (Built in Router,
switch and Access Point)
-
A single Cable or ADSL GATEWAY(everything
in one unit)
What You Will Need
I usually recommend purchasing all of the
components from the same manufacturer. Even though most all brands are designed
to work together, it may result in lower performance if you mix brands. Also,
it will be a lot easier when it comes to technical support to be calling just
one manufacturer for help. The same goes for mixing wireless standards, you
could purchase an 802.11g router and a mix of 802.11b and 802.11g cards. It
will work, but with reduced performance.
-
Cable or ADSL Modem
– Broadband providers usually offer the modem for free or for rent. In the
case of ADSL, the modem is usually provided for you. For cable modems the
rental fee is usually a few dollars per month or you can chose to provide your
own. If your provider is charging a dollar or two per month for the rental,
I would go with that. If they are charging more, you may want to consider
purchasing your own. Based on my experience so far, I have found that it is
not uncommon for the modem to start exhibiting problems after about 2-3
years. Lightning strikes and power surges could be a contributing factor to
these early failures. If you purchase a modem for $60 or rent for 3 years at
$2 per month, it is about a wash. But that is your choice and may be
completely different in Malaysia.
-
Cable/DSL Wireless
Router or Access Point
– You will need a Router and a Wireless Access Point or the more common
Wireless Router (which contains both a router and an access point in one
unit). Note: A few companies
make a combination Modem, Router, Access Point and Switch all in one unit.
You should also check the modem that may have come with your internet service,
because some providers are starting to supply Modem/routers units. One other
thing you need to check is that some providers have been known to supply a
modem with only a USB connection and this can not be used for setting up this
kind of network. Normally I would just go with wireless router, unless you
have a situation where you need to place the access point in a different
location than the router for better coverage or if you already own a router.
-
Wireless Cards for Each
Computer
– You will need a Wireless Card for each computer that you plan to use
wirelessly. Laptops –
Depending on how old your laptops are, some of these my have wireless
built-in. If not, you can purchase Wireless PCMCIA Cards for each.
Desktops
– You can purchase
either Wireless PCI cards that are installed into an available PCI slot inside
the computer or an external USB Wireless Adapters. I would recommend the
internal cards, especially if you already have several other devices connected
through USB, such as Printers, Keyboards, Mice and WebCams.
-
Surge Protectors or UPS
– I would make sure that the modem and router are both plugged into some form
of surge protector. Better still would be to use a UPS (Uninterruptible Power
Supply). These units have a built-in battery to power your equipment in the
event that the power goes out. I have seen some of the smaller units going
for as little as $30.
Preparing Computers For
Networking
If you plan to share files or printers
between computers, you will need to check some settings. I would suggest taking
the time to make sure all the computers are in good working order before
attempting to network them. At the very least you need to run a complete virus
scan on each computer. Depending on your configuration and settings, a single
computer that is infected with a virus can spread to your entire network
infecting all of your computers. I would also run a good spyware scanner on
each computer as well as perform some routine maintenance such as Disk Cleanup
and defrag. Perform the following tasks:
-
Check Computer Name and
Workgroup
– Right Click on MY COMPUTER- Left Click PROPERTIES – Left Click COMPUTER NAME
to check the Full Computer Name and Workgroup Name. You want to make sure
each computer has a different full computer name and at the same time
each computer is using the same workgroup name.
-
Turn off Firewalls
– For the initial setup, it is usually
easier to turn off or disable all software firewalls. You have one built into
Windows, but you may also have others installed that may be included with
Norton or McAfee internet security packages.
-
Shared Folder and
Printers
– If you are going to share files and/or
printers with other computers on your network, you can select these now.
-
Sharing Printers
– Select START – CONTROL PANEL – PRINTERS
AND FAXES, Right Click on the printer to be shared and select the
SHARING tab. Click the SHARE THIS PRINTER box. The Share Name box will now
contain a default name for the printer. You can leave the default name or
change it to whatever you want (keep the name to 8 characters). If your
network has computers running anything other than Windows XP, you will need
to add print drivers for the other versions of Windows (ADDITIONAL DRIVERS).
Otherwise, click OK to exit. You should now see a hand under the printer
icon, indicating that it is being shared. Perform the same steps above for
any additional printers you want to share.
-
Sharing Files
–
If you would like to share some of your files with other computers. Navigate
to the folder or file that you want to share using windows explorer or by
drilling down through MY COMPUTER or MY DOCUMENTS. Right Click the
folder or file name and select SHARING and SECURITY. Check the box next to
SHARE THIS FOLDER,
Setting up the Network
-
Verify Broadband
Connection
– The first thing you want to do is connect a single computer directly to your
cable modem or DSL modem. Run the setup disk that was given to you by your
provider and check to make sure everything is working correctly. If your
modem was already connected and running, you can skip this step. But if this
is a new installation or you have moved your modem to a different location,
test it with a single computer first before attempting to network.
-
Setting up the Router
and First Computer
– Now that you have determined that your
internet connection and modem is in good working order, you can move onto
setting up the router and first computer. Connect the Router to the modem and
then plug your first computer into the router. Run the setup disk that came
with you router to get the first computer up and running. You can run the
Windows XP network wizard which will prompt you to create a setup disk for the
remaining computers or choose to do everything manually.
Note: I would recommend not
applying any security until you have all the computers up and running on the
network. I would change the default SSID, so that you will recognize your
network later.
-
Setting up the Remaining
Wired Computers
– You can now proceed onto setting up each
of the remaining computers. With the power off, plug in each additional wired
computer and power on. Run the Windows Network Wizard or use the disk you
created from before. If you plan to share any folders or printers, you can
set those up as you go for each computer.
-
Setting up the Wireless
Computers
– If your laptops came with built-in
wireless networking, you may need to first turn the wireless receiver on (Most
laptops default setting is off to save power, see instructions for laptop).
You should see a popup that indicates that the laptop has found a wireless
connection. Click on this to see a listing of the available connections. If
there are other wireless networks in your area you will see them listed.
Scroll down until you see your network (whatever name you used for SSID), then
click on that and connect. It will ask you if you are sure you want to
connect to this unsecured network. Go ahead and connect.
If you are installing wireless cards,
follow the instructions that came with the card to install the drivers and
then follow the instructions above.
Security Settings
You should have your network up and running
now without any security or firewalls running. So it is time to start setting up
your security. Keep in mind that the factory defaults for wireless has Zero
security. Personally, I am not a fanatic about security and I don’t have
anything that anyone would want, so I try not to get too carried away. But if
it is a real concern, there are a number of security measures you can take
depending on the type of hardware and software you have. Most Wireless Routers
and Access Points have several setting you can adjust to add security to your
network. I would recommend changing only one or two settings at a time and then
testing your network before continuing.
-
Change all Default
Passwords
– The first thing to do is change all the default passwords for your router or
access point. The default passwords are common knowledge to most anyone.
-
Change the SSID
– I
would change the SSID (network Name) as mentioned above, as well as you may
want to turn off the broadcasting of the SSID. With broadcasting turned off,
someone would have to know your network name before attempting to hack.
-
Enable WEP
–
Depending on your router you may have the option to enable 64 bit or 128 bit
encryption. If this is enabled you will need to create a code and then write
it down to apply it to each wireless computer that is going to be on the
network. Someone would have to guess or try every possible combination to gain
access.
-
WPA
– The newer
Wireless equipment may also offer this form of security which is considered to
be far more secure. If your router offers
WPA then I would use it instead of WEP.
-
MAC Filtering
–
You can also select Mac filtering to allow only those computers that have a
specific Mac Address to access your network. The Mac address is somewhat like
a serial number for your computer. Someone could still access your network if
they knew this address.
Firewalls
- After you have applied all of the security settings you want, you should now
go back to each computer and turn on any firewalls that you may have. This
would include the Windows Firewall or any third party firewall software. You
will have to go into the firewall settings for each computer and enable print
and files sharing (if needed), and you may have to enable network activity by
entering in the IP address range of you network computers.
For more information regarding Wireless
Networking check out the section on Poor Wireless Range.
Back to Top

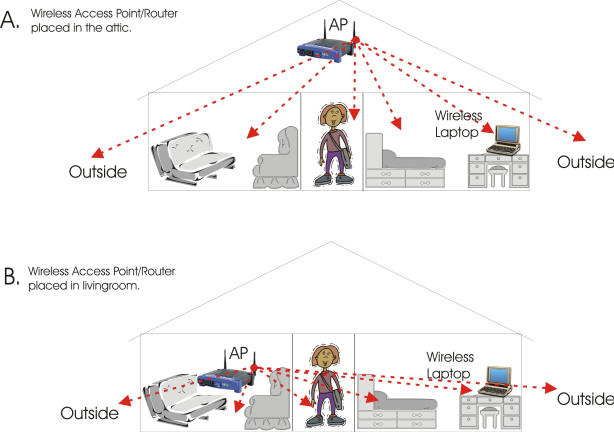 Even slight changes in location can make a big difference. Try
moving the transmitter (Router, Access Point) to different locations.
I have seen situations where moving the transmitter 3 feet higher to a
shelf made all the difference in the world. I can't stress
enough the importance of trying different locations for the router or
access point.
Even slight changes in location can make a big difference. Try
moving the transmitter (Router, Access Point) to different locations.
I have seen situations where moving the transmitter 3 feet higher to a
shelf made all the difference in the world. I can't stress
enough the importance of trying different locations for the router or
access point.